Modern React testing, part 4: Cypress and Cypress Testing Library
Cypress is a framework-agnostic end-to-end testing (also known as E2E, or integration testing) tool for web apps. Together with Cypress Testing Library and Mock Service Worker, it gives the best test writing experience and makes writing good, resilient to changes, tests straightforward.
This is the fourth article in the series, where we learn how to test React apps end-to-end using Cypress and Cypress Testing Library, and how to mock network requests using Mock Service Worker.
- Modern React testing, part 1: best practices
- Modern React testing, part 2: Jest and Enzyme
- Modern React testing, part 3: Jest and React Testing Library
- Modern React testing, part 4: Cypress and Cypress Testing Library (this post)
- Modern React testing, part 5: Playwright
Check out the GitHub repository with all the examples.
Getting started with Cypress and Cypress Testing Library
We’ll set up and use these tools:
- Cypress, an end-to-end test runner;
- Cypress Testing Library, additional semantic queries.
- Mock Service Worker, mocking network requests.
- start-server-and-test, starts a server, waits for the URL, then runs the test command.
Why Cypress and Cypress Testing Library
Cypress has many benefits over other end-to-end test runners:
- The best experience of writing and debugging tests.
- Ability to inspect the page at any moment during the test run using the browser developer tools.
- All commands wait for the DOM to change when necessary, which simplifies testing async behavior.
- Tests better resemble real user behavior. For example, Cypress checks that a button is visible, isn’t disabled, and isn’t hidden behind another element before clicking it.
- Supports Chrome, Firefox and Edge.
Cypress Testing Library makes Cypress even better:
- Convenient semantic queries, like finding elements by their label text or ARIA role.
- Libraries for other frameworks with the same queries.
Testing Library helps us write good tests and makes writing bad tests difficult. It allows us to interact with the app similar to how a real user would do that: for example, find form elements and buttons by their labels. It helps us to avoid testing implementation details, making our tests resilient to code changes that don’t change the behavior.
Setting up Cypress and Cypress Testing Library
First, install all the dependencies:
npm install --save-dev cypress @testing-library/cypress start-server-and-testThen add a few scripts to our package.json file:
{
  "name": "pizza",
  "version": "1.0.0",
  "scripts": {
    "start": "react-scripts start",
    "build": "react-scripts build",
    "cypress": "cypress open",
    "cypress:headless": "cypress run --browser chrome --headless",
    "test:e2e": "start-server-and-test start 3000 cypress",
    "test:e2e:ci": "start-server-and-test start 3000 cypress:headless"
  },
  "dependencies": {
    "react": "16.13.0",
    "react-dom": "16.13.0",
    "react-scripts": "3.4.0"
  },
  "devDependencies": {
    "@testing-library/cypress": "^6.0.0",
    "cypress": "^4.10.0",
    "start-server-and-test": "^1.11.0"
  }
}
Cypress, unlike React Testing Library or Enzyme, tests a real app in a real browser, so we need to run our development server before running Cypress. We can run both commands manually in separate terminal windows — good enough for local development — or use start-server-and-test tool to have a single command that we can also use on continuous integration (CI).
As a development server, we can use an actual development server of our app, like Create React App in this case, or another tool like React Styleguidist or Storybook, to test isolated components.
We’ve added two scripts to start Cypress alone:
npm run cypressto open Cypress in the interactive mode, where we can choose which tests to run in which browser;npm run cypress:headlessto run all tests using headless Chrome.
And two scripts to run Create React App development server and Cypress together:
npm run test:e2eto run dev server and Cypress ready for local development;npm run test:e2e:cito run dev server and all Cypress tests in headless Chrome, ideal for CI.
Tip For projects using Yarn, change the start-server-and-test commands like so:
-    "test:e2e": "start-server-and-test start 3000 cypress",
-    "test:e2e:ci": "start-server-and-test start 3000 cypress:headless"
+    "test:e2e": "start-server-and-test 'yarn start' 3000 'yarn cypress'",
+    "test:e2e:ci": "start-server-and-test 'yarn start' 3000 'yarn cypress:headless'"
Then, create a Cypress config file, cypress.json in the project root folder:
{
  "baseUrl": "http://localhost:3000",
  "video": false
}
The options are:
baseUrlis the URL of our development server to avoid writing it in every test;videoflag disables video recording on failures — in my experience, videos aren’t useful and take a lot of time to generate.
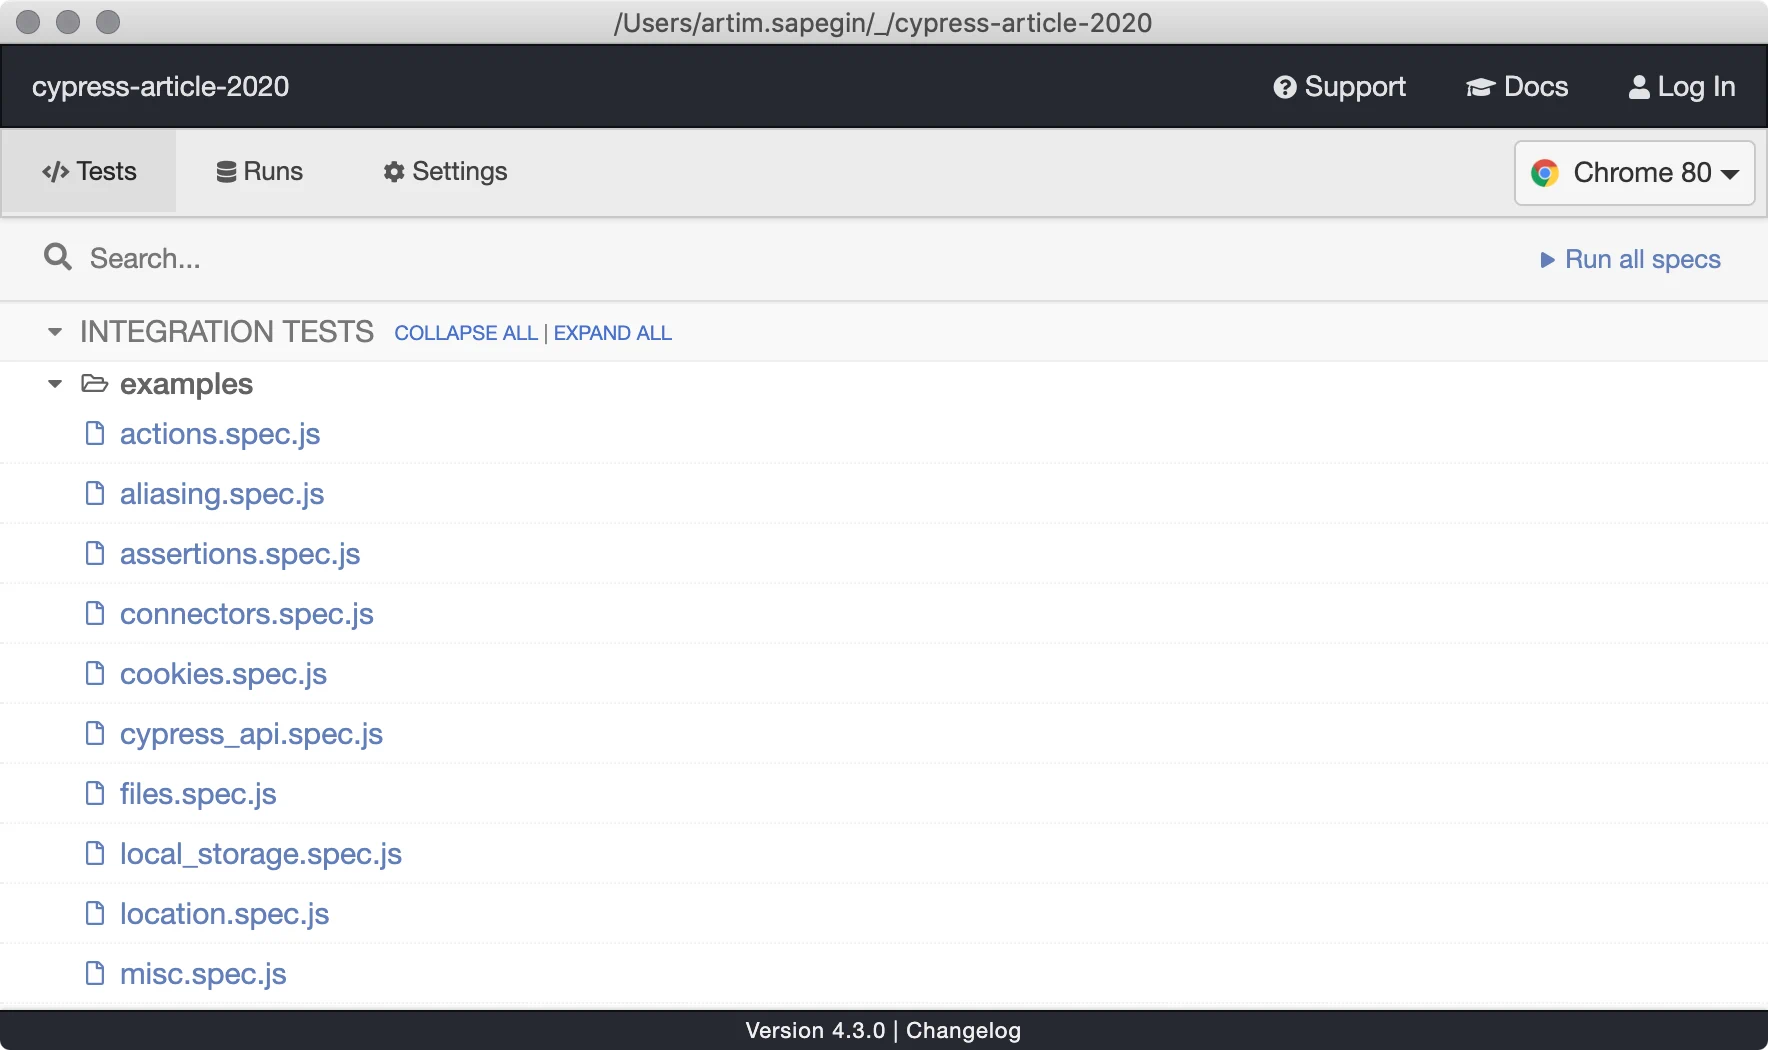
Now, run npm run cypress to create all the necessary files and some example tests that we can run by pressing “Run all specs” button:
Before we start writing tests, we need to do one more thing — set up Cypress Testing Library. Open cypress/support/index.js, and add the following:
// Testing Library queries for Cypress
import '@testing-library/cypress/add-commands';Setting up Mock Service Worker
We’re going to use Mock Service Worker (MSW) for mocking network requests in our integration tests, and in the app during development. Cypress has its way of mocking network, but I think MSW has several benefits:
- It uses Service Workers, so it intercepts all network requests, no matter how there are made.
- A single place to define mocks for the project, with the ability to override responses for particular tests.
- An ability to reuse mocks in integration tests and during development.
- Requests are still visible in the browser developer tools.
- Supports REST API and GraphQL.
First, install MSW from npm:
npm install --save-dev mswCreate mock definitions, src/mocks/handlers.js:
import { rest } from 'msw';

export const handlers = [
  rest.get('https://httpbin.org/anything', (req, res, ctx) => {
    return res(
      ctx.status(200),
      ctx.json({
        args: {
          ingredients: ['bacon', 'tomato', 'mozzarella', 'pineapples']
        }
      })
    );
  })
];
Note To mock GraphQL requests instead of REST, we could use the GraphQL namespace.
Here, we’re intercepting GET requests to https://httpbin.org/anything with any parameters and returning a JSON object with OK status.
Now we need to generate the Service Worker script:
npx msw init public/
Note The public directory may be different for projects not using Create React App.
Create another JavaScript module that will register our Service Worker with our mocks, src/mocks/browser.js:
import { setupWorker, rest } from 'msw';
import { handlers } from './handlers';

// This configures a Service Worker with the given request handlers
export const worker = setupWorker(...handlers);

// Expose methods globally to make them available in integration tests
window.msw = { worker, rest };
And the last step is to start the worker function when we run our app in development mode. Add these lines to our app root module (src/index.js for Create React App):
if (process.env.NODE_ENV === 'development') {
  const { worker } = require('./mocks/browser');
  worker.start();
}

function App() {
  // ...
}
Now, every time we run our app in development mode or integration tests, network requests will be mocked, without any changes to the application code or tests, except four lines of code in the root module.
Creating our first test
By default, Cypress looks for test files inside the cypress/integration/ folder. Feel free to remove the examples/ folder from there — we won’t need it.
So, let’s create our first test, cypress/integration/hello.js:
describe('Our first test', () => {
  it('hello world', () => {
    cy.visit('/');
    cy.findByText(/pizza/i).should('be.visible');
  });
});
Here, we’re visiting the homepage of our app running in the development server, then testing that the text “pizza” is present on the page using Testing Library’s findByText() method and Cypress’s should() matcher.
Running tests
Run the development server, npm start, and then Cypress, npm run cypress, or run both with npm run test:e2e. From here run a single test or all tests, Cypress will rerun tests on every change in the code of the test.
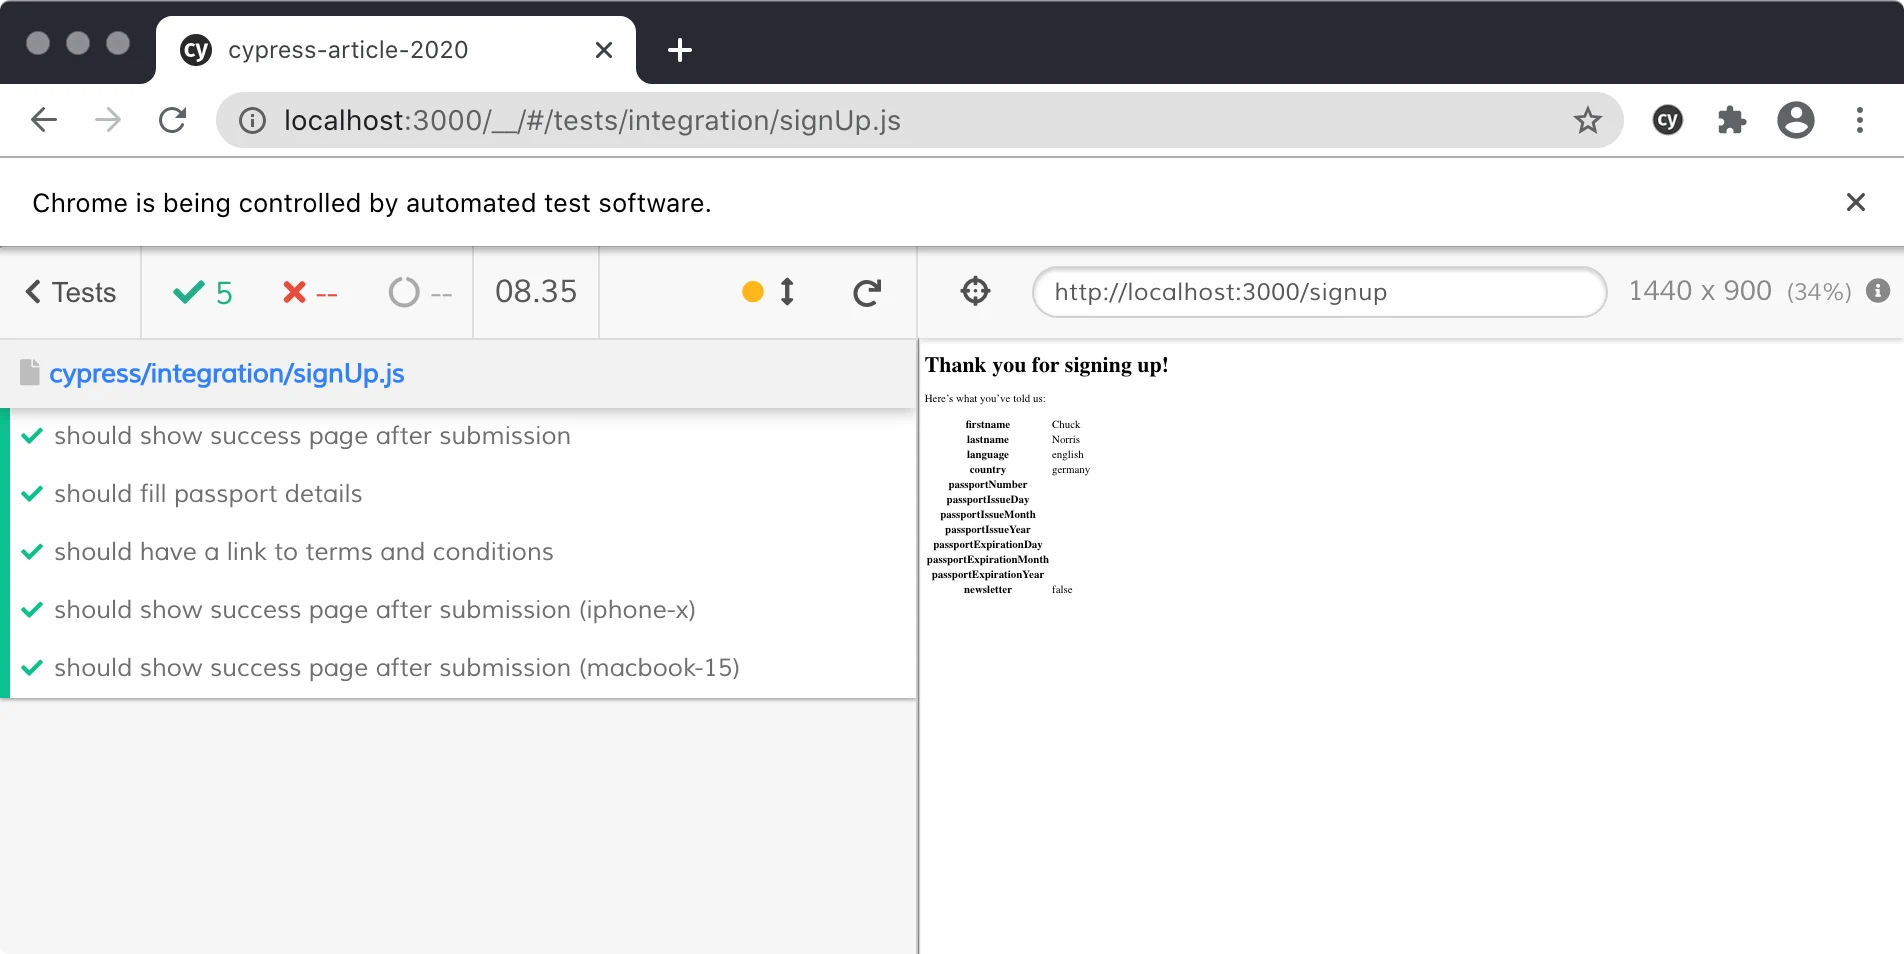
When I write tests, I usually run a single test, otherwise it’s too slow and too hard to see what’s wrong if there are any issues.
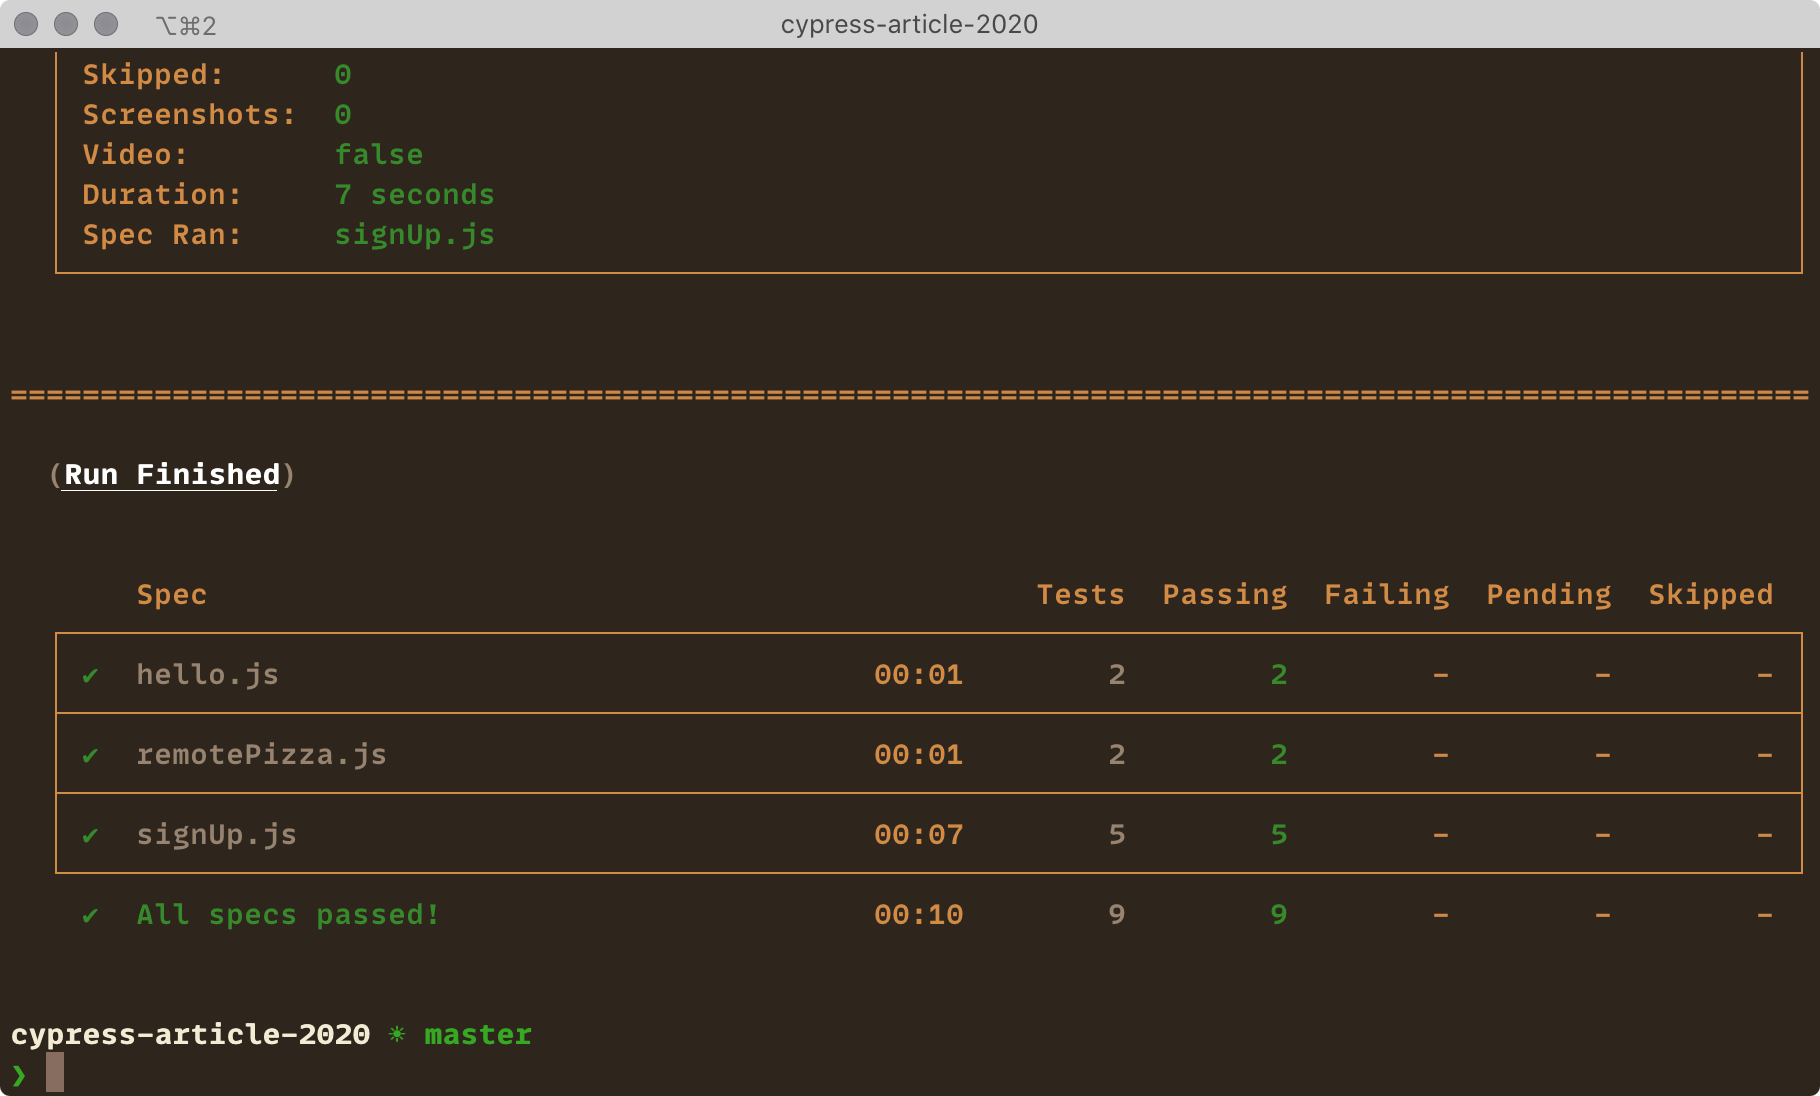
Run npm run test:e2e:ci to run all tests in headless mode, meaning we won’t see the browser window:
Querying DOM elements for tests
Tests should resemble how users interact with the app. That means we shouldn’t rely on implementation details because the implementation can change and we’ll have to update our tests. This also increases the chance of false positives when tests are passing but the actual feature is broken.
Let’s compare different methods of querying DOM elements:
| Selector | Recommended | Notes |
|---|---|---|
button | Never | Worst: too generic |
.btn.btn-large | Never | Bad: coupled to styles |
#main | Never | Bad: avoid IDs in general |
[data-testid="cookButton"] | Sometimes | Okay: not visible to the user, but not an implementation detail, use when better options aren’t available |
[alt="Chuck Norris"], [role="banner"] | Often | Good: still not visible to users, but already part of the app UI |
[children="Cook pizza!"] | Always | Best: visible to the user part of the app UI |
To summarize:
- Text content may change and we’ll need to update our tests. This may not be a problem if our translation library only render string IDs in tests, or if we want our test to work with the actual text users see in the app.
- Test IDs clutter the markup with props we only need in tests. Test IDs are also something that users of our app don’t see: if we remove a label from a button, a test with test ID will still pass.
Cypress Testing Library has methods for all good queries. There are two groups of query methods:
cy.findBy*()finds a matching element, or fails when an element not found after a default timeout or more than one element found;cy.findAllBy*()finds all matching elements.
And the queries are:
cy.findByLabelText()finds a form element by its<label>;cy.findByPlaceholderText()finds a form element by its placeholder text;cy.findByText()finds an element by its text content;cy.findByAltText()finds an image by its alt text;cy.findByTitle()finds an element by itstitleattribute;cy.findByDisplayValue()finds a form element by its value;cy.findByRole()finds an element by its ARIA role;cy.findByTestId()finds an element by its test ID.
All queries are also available with the findAll* prefix, for example, cy.findAllByLabelText() or cy.findAllByRole().
Let’s see how to use query methods. To select this button in a test:
<button data-testid="cookButton">Cook pizza!</button>We can either query it by the test ID:
cy.findByTestId('cookButton');Or query it by its text content:
cy.findByText(/cook pizza!/i);Note the regular expression (/cook pizza!/i) instead of a string literal ('Cook pizza!') to make the query more resilient to small tweaks and changes in the content.
Or, the best method, query it by its ARIA role and label:
cy.findByRole('button', { name: /cook pizza!/i });Benefits of the last method are:
- doesn’t clutter the markup with test IDs, that aren’t perceived by users;
- doesn’t give false positives when the same text is used in non-interactive content;
- makes sure that the button is an actual
buttonelement or at least have thebuttonARIA role.
Check the Testing Library docs for more details on which query to use, and inherent roles of HTML elements.
Testing React apps end-to-end
Testing basic user interaction
A typical integration test looks like this: visit the page, interact with it, check the changes on the page after the interaction. For example:
it('navigates to another page', () => {
  cy.visit('/');

  cy.log('Opening the pizza page');
  cy.findByRole('link', { name: /remotepizza/i }).click();

  cy.log('We are on the pizza page');
  cy.findByRole('heading', { name: /pizza/i }).should('be.visible');
});
Here we’re finding a link by its ARIA role and text using the Testing Library’s findByRole() method, and clicking it using the Cypress’ click() method. Then we’re verifying that we’re on the correct page by checking its heading, first by finding it the same way we found the link before, and testing with the Cypress’ should() method.
With Cypress we generally don’t have to care if the actions are synchronous or asynchronous: each command will wait for some time for the queried element to appear on the page. Though the code looks synchronous, each cy.* method puts a command into a queue that Cypress executes asynchronously. This avoids flakiness and complexity of asynchronous testing, and keeps the code straightforward.
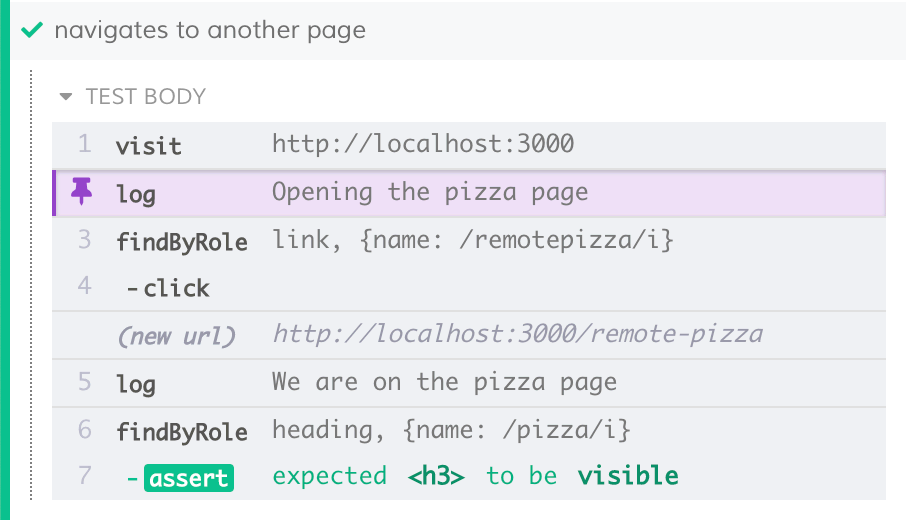
Also, note calls to the Cypress’ log() method: this is more useful than writing comments because these messages are visible in the command log:
Testing forms
Testing Library allows us to access any form element by its visible or accessible label.
For example, we have a registration form with text inputs, selects, checkboxes and radio buttons. We can test it like this:
it('should show success page after submission', () => {
  cy.visit('/signup');

  cy.log('Filling the form');
  cy.findByLabelText(/first name/i)
    .clear()
    .type('Chuck');
  cy.findByLabelText(/last name/i)
    .clear()
    .type('Norris');
  cy.findByLabelText(/country/i).select('Russia');
  cy.findByLabelText(/english/i).check();
  cy.findByLabelText(/subscribe to our newsletter/i).check();

  cy.log('Submit the form');
  cy.findByRole('button', { name: /sign in/i }).click();

  cy.log('We are on the success page');
  cy.findByText(/thank you for signing up/i).should('be.visible');
});
Here we’re using Testing Library’s findByLabelText() and findByRole() methods to find elements by their label text or ARIA role. Then we’re using Cypress’ clear(), type(), select() and check() methods to fill the form, and the click() method to submit it by clicking the submit button.
Testing complex forms
In the previous example, we used the findByLabelText() method to find form elements, which works when all form elements have unique labels, but this isn’t always the case.
For example, we have a passport number section in our registration form where multiple inputs have the same label — like “year” of the issue date and “year” of the expiration date. The markup of each field group looks like so:
<fieldset>
  <legend>Passport issue date</legend>
  <input type="number" aria-label="Day" placeholder="Day" />
  <select aria-label="Month">
    <option value="1">Jan</option>
    <option value="2">Feb</option>
    ...
  </select>
  <input type="number" aria-label="Year" placeholder="Year" />
</fieldset>
To access a particular field, we can select a fieldset by its legend text, and then select an input by its label inside the fieldset.
cy.findByRole('group', { name: /passport issue date/i }).within(
  () => {
    cy.findByLabelText(/day/i).clear().type('12');
    cy.findByLabelText(/month/i).select('5');
    cy.findByLabelText(/year/i).clear().type('2004');
  }
);
We call Testing Library’s findByRole() method with group — ARIA role of fieldset — and its legend text.
Any Cypress’ commands we call in the within() callback only affect the part of the page we call within() on.
Testing links
Cypress doesn’t support multiple tabs, which makes testing links that open in a new tab tricky. There are several ways to test such links:
- check the link’s
hrefwithout clicking it; - remove the
targetattribute before clicking the link.
Note that with external links, we can only use the first method.
In the first method, we query the link by its ARIA role and text, and verify that the URL in its href attribute is correct:
cy.findByRole('link', { name: /terms and conditions/i })
  .should('have.attr', 'href')
  .and('include', '/toc');
The main drawback of this method is that we’re not testing that the link is actually clickable. It might be hidden, or might have a click handler that prevents the default browser behavior.
In the second method, we query the link by its ARIA role and text again, remove the target="_blank" attribute to make it open in the same tab, and then click it:
cy.findByRole('link', { name: /terms and conditions/i })
  .invoke('removeAttr', 'target')
  .click();
cy.findByText(/i'm baby/i).should('be.visible');
Now we could check that we’re on the correct page by finding some text unique to this page.
I recommend this method because it better resembles the actual user behavior. Unless we have an external link, and the first method is our only choice.
There are a few other solutions, but I don’t think they are any better than these two.
Testing network requests, and mocks
Having MSW mocks setup (see “Setting up Mock Service Worker” above), happy path tests of pages with asynchronous data fetching aren’t different from any other tests.
For example, we have an API that returns a list of pizza ingredients:
const ingredients = ['bacon', 'tomato', 'mozzarella', 'pineapples'];

it('load ingredients asynchronously', () => {
  cy.visit('/remote-pizza');

  cy.log('Ingredients list is not visible');
  cy.findByText(ingredients[0]).should('not.be.visible');

  cy.log('Load ingredients');
  cy.findByRole('button', { name: /cook/i }).click();

  cy.log('All ingredients appear on the screen');
  for (const ingredient of ingredients) {
    cy.findByText(ingredient).should('be.visible');
  }

  cy.log('The button is not clickable anymore');
  cy.findByRole('button', { name: /cook/i }).should('be.disabled');
});
Cypress will wait until the data is fetched and rendered on the screen, and thanks to network calls mocking it won’t be long.
For not so happy path tests, we may need to override global mocks inside a particular test. For example, we could test what happens when our API returns an error:
it('shows an error message', () => {
  cy.visit('/remote-pizza');

  cy.window().then(window => {
    // Reference global instances set in src/browser.js
    const { worker, rest } = window.msw;
    worker.use(
      rest.get('https://httpbin.org/anything', (req, res, ctx) => {
        return res.once(ctx.status(500));
      })
    );
  });

  cy.log('Ingredients list is not visible');
  cy.findByText(ingredients[0]).should('not.be.visible');

  cy.log('Load ingredients');
  cy.findByRole('button', { name: /cook/i }).click();

  cy.log(
    'Ingredients list is still not visible and error message appears'
  );
  cy.findByText(ingredients[0]).should('not.be.visible');
  cy.findByText(/something went wrong/i).should('be.visible');
});
Here, we’re using the MSW’s use() method to override the default mock response for our endpoint during a single test. Also note that we’re using res.once() instead of res(), otherwise the override will be added permanently and we’d have to clean it like this:
afterEach(() => worker.resetHandlers());Testing complex pages
We should avoid test IDs wherever possible, and use more semantic queries instead. However, sometimes we need to be more precise. For example, we have a “delete profile” button on our user profile page that shows a confirmation modal with “delete profile” and “cancel” buttons inside. We need to know which of the two delete buttons we’re pressing in our tests.
The markup would look like so:
<button type="button">Delete profile</button>
<div data-testid="delete-profile-modal">
  <h1>Delete profile</h1>
  <button type="button">Delete profile</button>
  <button type="button">Cancel</button>
</div>
And we can test it like so:
it('should show success message after profile deletion', () => {
  cy.visit('/profile');

  cy.log('Attempting to delete profile');
  cy.findByRole('button', { name: /delete profile/i }).click();

  cy.log('Confirming deletion');
  cy.findByTestId('delete-profile-modal').within(() => {
    cy.findByRole('button', { name: /delete profile/i }).click();
  });

  cy.log('We are on the success page');
  cy.findByRole('heading', {
    name: /your profile was deleted/i
  }).should('be.visible');
});
Here, we’re using Testing Library’s findByRole() method, as in previous examples, to find both “delete profile” buttons. However, for the button inside the modal we’re using findByTestId() and Cypress’s within() method to wrap the findByRole() call and limit its scope to the contents of the modal.
Testing responsive pages
If the UI differs depending on the screen size, like some of the components are rendered in different places, it might be a good idea to run tests for different screen sizes.
With the Cypress’ viewport() method, we can change the viewport size either by specifying exact width and height or using one of the presets, like iphone-x or macbook-15.
for (const viewport of ['iphone-x', 'macbook-15']) {
  it(`should show success page after submission (${viewport})`, () => {
    cy.viewport(viewport);
    cy.visit('/signup');

    cy.log('Filling the form');
    cy.findByLabelText(/first name/i)
      .clear()
      .type('Chuck');
    cy.findByLabelText(/last name/i)
      .clear()
      .type('Norris');

    cy.log('Submit the form');
    cy.findByRole('button', { name: /sign in/i }).click();

    cy.log('We are on the success page');
    cy.findByText(/thank you for signing up/i).should('be.visible');
  });
}Debugging
Cypress docs have a thorough debugging guide.
However, it’s usually enough to inspect the DOM for a particular step of the test after running the tests. Click any operation in the log to pin it, and the resulting DOM will appear in the main area, where we could use the browser developer tools to inspect any element on the page.
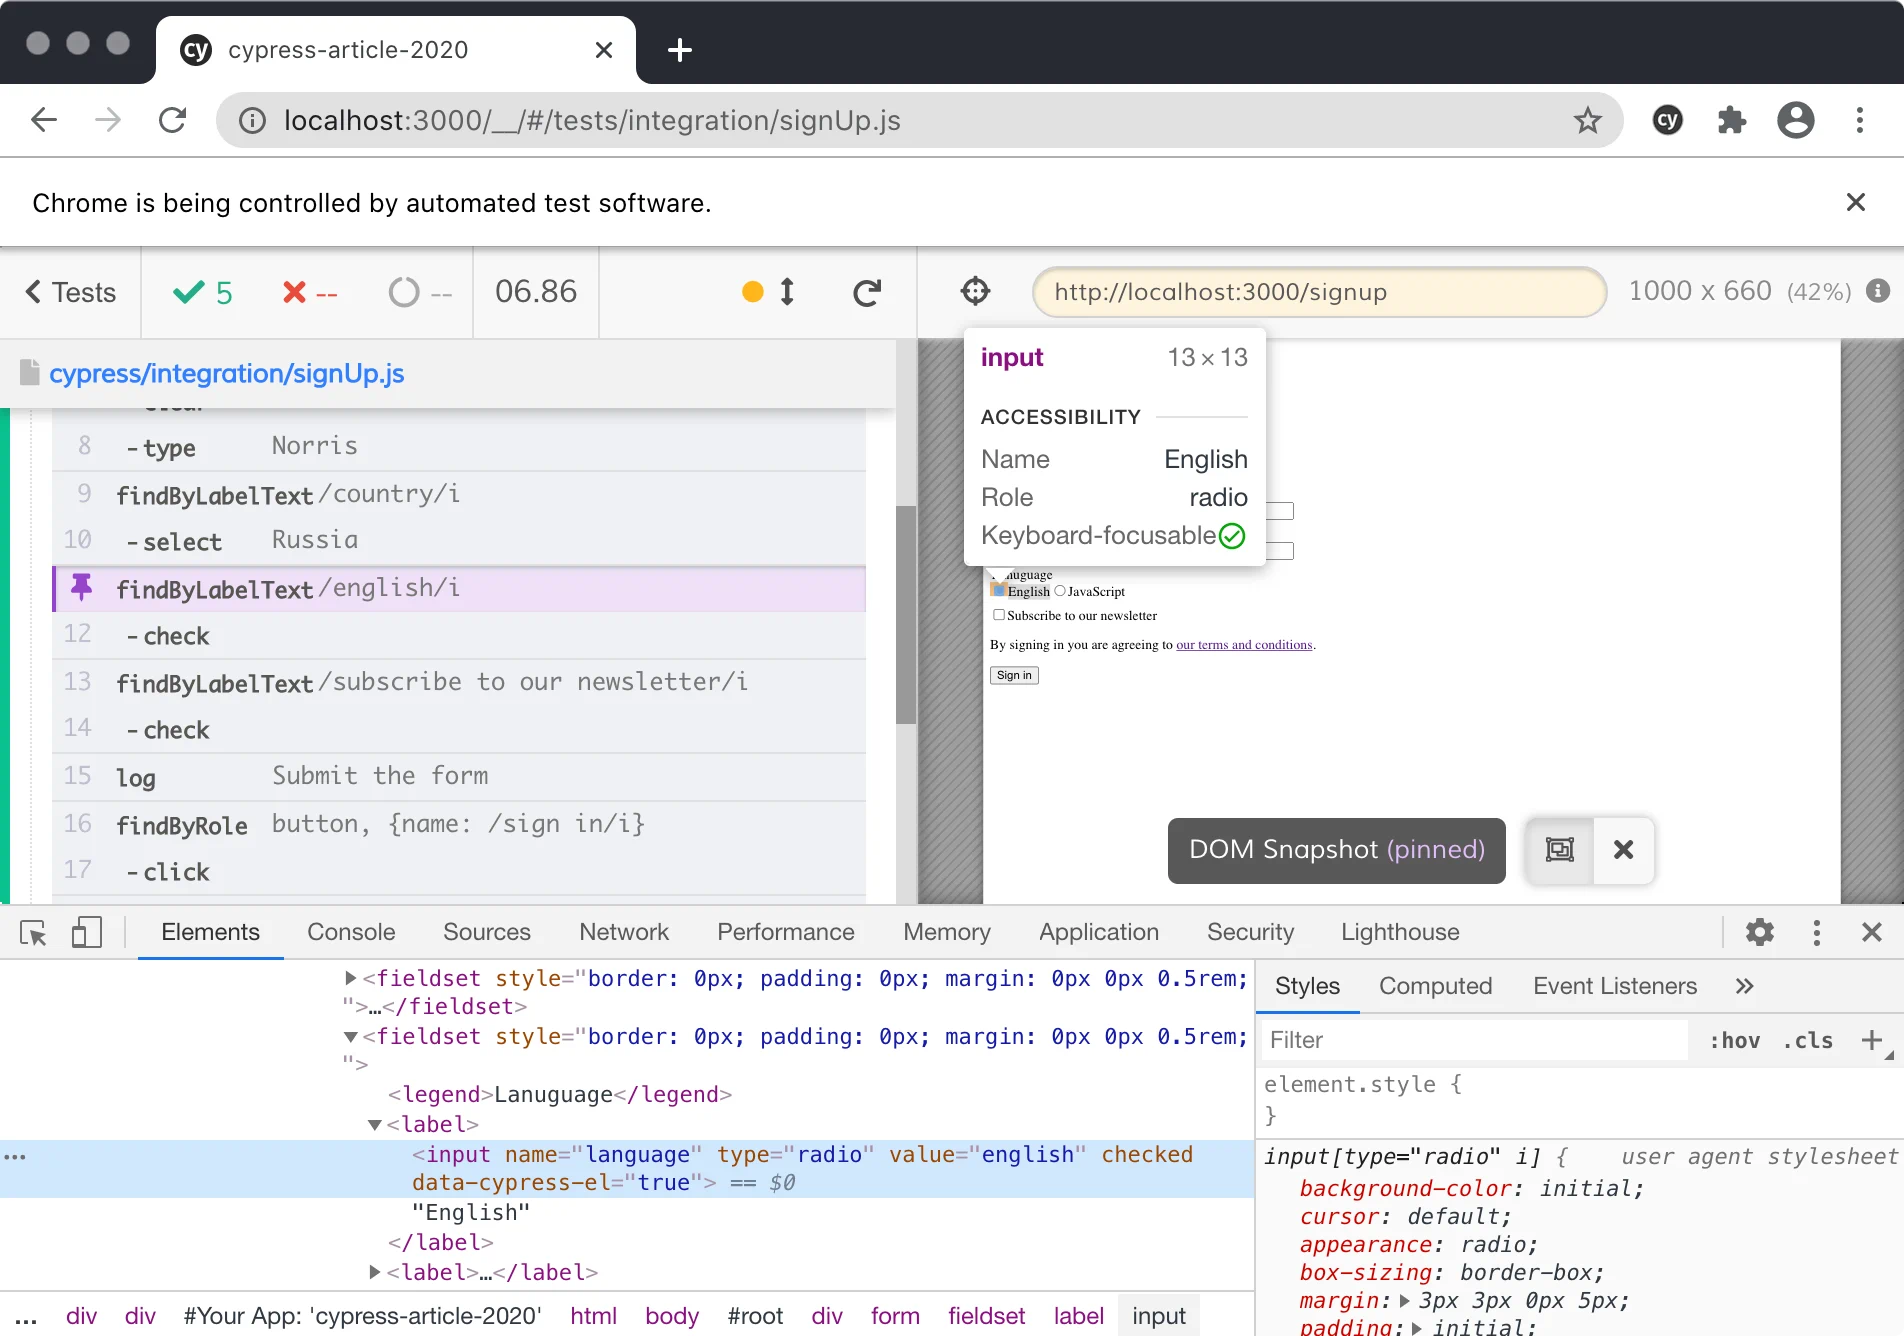
I also often focus a particular test with it.only() to make rerun faster and avoid seeing too many errors while I debug why tests are failing.
it.only('hello world', () => {
  // Cypress will skip other tests in this file
});Troubleshooting
I don’t recommend doing this, but on legacy projects we may not have other choices than to increase the timeout for a particular operation. By default Cypress will wait for four seconds for the DOM to be updated. We can change this timeout for every operation. For example, navigation to a new page may be slow, so we can increase the timeout:
cy.log('We are on the success page');
cy.findByText(/thank you for signing up/i, {
  timeout: 10_000
}).should('be.visible');
This is still better than increasing the global timeout.
Conclusion
Good tests interact with the app similar to how a real user would do that, they don’t test implementation details, and they are resilient to code changes that don’t change the behavior. We’ve learned how to write good end-to-end tests using Cypress and Cypress Testing Library, how to set it up, and how to mock network requests using Mock Service Worker.
However, Cypress has many more features that we haven’t covered in the article, and that may be useful one day.
Thanks to Artem Zakharchenko, Alexei Crecotun, Troy Giunipero.